 Symbol: Push Sq.
Having unlocked the door, input the Dying Chamber and take the Medium Weight off the chair. Re-enter the cellular block space to search out the entire up to now locked cells opened, and the door main again during the Guardroom locked. For a Extraordinary Picture, cross to the top of the cellular block and input Mobile E1, the place you’ll be able to make a hollow within the wall to succeed in the opposite facet once more. In Mobile E13, you’ll be able to to find the Extraordinary Picture.
Extraordinary Picture #1: 4 Months to Pass
After environment the alarm off within the Serpent Phase while you energy the Witness Room Generator, re-enter the cellular block and cross to the top of the hall. You’ll be able to spoil open a hollow within the wall in Mobile E1 and use it to get right of entry to the former space you have been simply in. Within Mobile E13 on a shelf would be the Extraordinary Picture.
Pictures: Push Sq.
To growth, cross to Mobile E10 and squeeze during the hole within the wall to succeed in the left-hand room with the Armory Key and ammo and well being provides within. You’ll be able to achieve the Witness Checkpoint during the door, then free up the following door to go back to ground 1F Major Phase. Now you’ve got the Armory Key, you’ll be able to free up the cupboard with the Rifle within.
Pictures: Push Sq.
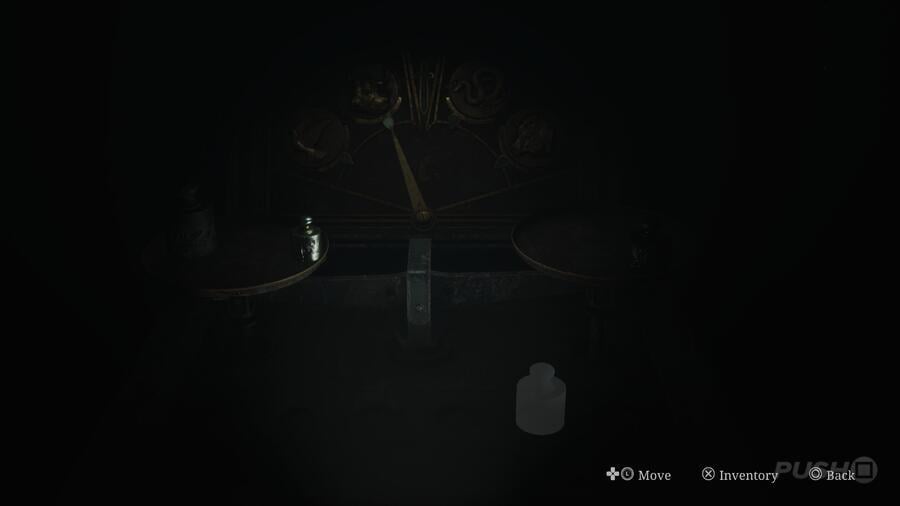
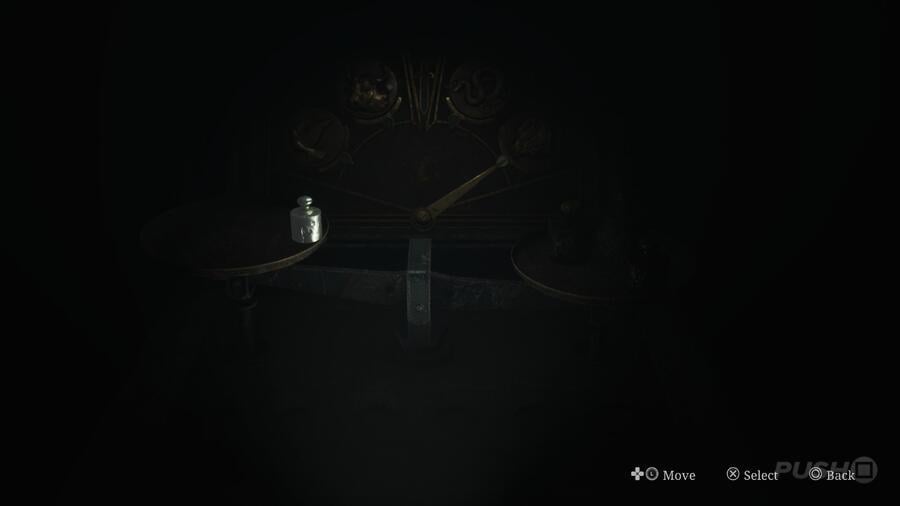
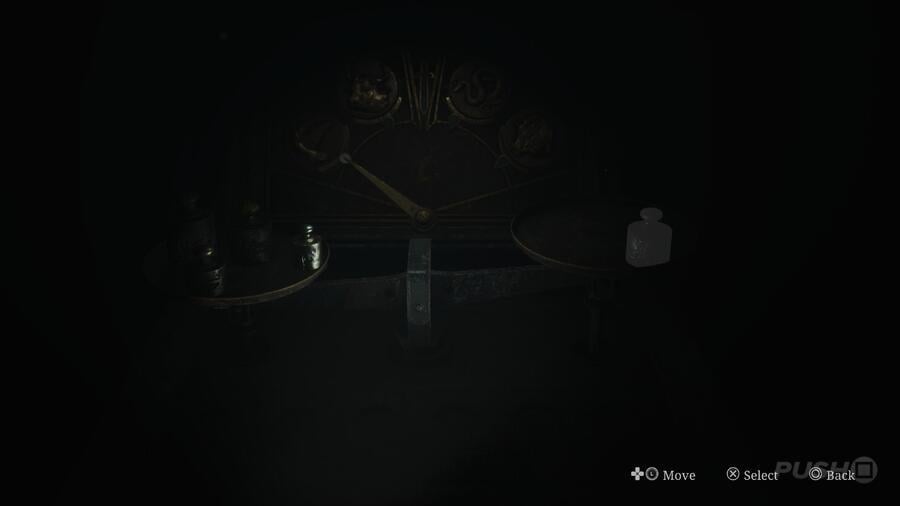
Now go back to the Scales within the Backyard and position the Heavy Weight and the Small Weight at the left-hand facet, and the Medium Weight at the appropriate. This unlocks the Hornless Ox door in Block A.
 Symbol: Push Sq.
Head there subsequent and take the steps as much as ground 2F. Take the Memo off the left-hand wall, then head appropriate alongside Block C to the Guardroom, the place within the table drawer you’ll be able to to find the Block D Key.
Memo #3: Guard’s Letter
After arranging the weights at the Scales to free up the Hornless Ox door, cross up the staircase appropriate after it and apply the hall on ground 2F to the left to search out the Guard’s Letter pinned at the wall subsequent to a door.
Pictures: Push Sq.
Use the Block D Key to go into, then apply the hall round to Mobile D5 to discover a Shiv Key hiding within the wall and a Threatening Notice.
Memo #4: Threatening Notice
Having discovered the Block D Key, input Block D and head within Mobile D5. The Memo will probably be pinned to the wall in entrance.
Pictures: Push Sq.
The Shiv Key can be utilized free up Mobile C4 in this similar ground, the place a crawlspace will permit you get right of entry to into the internal workings of the jail at the back of the cells. You can discover a Paranoid Notice on some of the pipes.
Memo #5: Paranoid Notice
Whilst you use the Shiv Key to free up Mobile C4, use the crawlspace and at the different facet will probably be this Memo put on a pipe.
Pictures: Push Sq.
Squeeze during the pipes at the left to search out some other crawlspace down at the flooring for your appropriate main into the Bathrooms. You will not to find a lot in right here, however proceed on into the Converting Room for a Syringe, Rifle Rounds, and some other Memo.
Memo #6: Crumpled Notice
In a while after Memo #5: Paranoid Notice, cross during the Bathrooms into the Converting Rooms to search out this Memo put on a bench.
Pictures: Push Sq.
Input the Showers space subsequent to top off on various ammo, in addition to a Glimpse of the Previous at the right-hand wall as you input. At the again wall is a hollow James can stick his hand into; settle for the quest recommended thrice to get the Heavy Weight. The room will come alive with enemies once you select it up, so watch out.
Glimpses of the Previous #3
Whilst you input the Showers space on ground 2F, hug the right-hand wall from the standpoint you input from, and this Glimpse of the Previous will probably be at the flooring subsequent to a moldy a part of the wall.
Pictures: Push Sq.
Retrace your steps again during the Bathrooms and Block C to take the staircase backtrack to ground 1F and the Scales within the Backyard. Now it is time to free up the Eyeless Boar door, which is finished by means of hanging the smallest weight at the left, after which the entire others at the appropriate. Pass there now to realize get right of entry to to the Boar Phase of ground 1F.
 Symbol: Push Sq.
Practice the hall round to the correct to go into the Warehouse, the place 2 enemies want killing. You’ll be able to then select a Extraordinary Picture up off the table and grasp some ammo.
Extraordinary Picture #2: Previous Guy’s All the time Ready
Having organized the weights at the Scales to open the Eyeless Boar door, head into the Warehouse by means of its jap door and select the Extraordinary Picture up off the table.
Pictures: Push Sq.
Depart and head for the Visitation Room subsequent, the place within the ultimate sales space will probably be a Memo referred to as the Prisoner’s Letter.
Memo #7: Prisoner’s Letter
Within the Visitation Room of the Boar Phase on ground 1F, seek the ultimate sales space to search out this Memo.
Pictures: Push Sq.
Climb during the window subsequent to the Prisoner’s Letter to succeed in the opposite facet, then apply the trail round to a hall surrounding the Wreck Room. In its southwest nook is some other some of the Glimpses of the Previous, then within the Wreck Room itself is ammo and a observe to learn off within the smaller room the place the table is.
Glimpses of the Previous #4
Within the hall surrounding the Wreck Room within the Boar Phase of ground 1F, head for the southwest nook the place chairs and beds are stacked up towards a door. In entrance of them would be the Glimpse of the Previous at the flooring.
Pictures: Push Sq.
The Infirmary is your subsequent port of name, the place simply as many ammo and well being provides watch for as there are enemies. Seek the realm as soon as the latter are useless, then head for the again room to search out the Higher Ground Key and a Memo at the table reverse it. The Higher Ground Key can be utilized at the locked door within the hall that surrounds the Wreck Room, so double again and free up it subsequent.
Memo #8: Unfinished File
Within the Infirmary space, head for the room on the again and you’ll be able to to find the Unfinished File on a table reverse the Higher Ground Key.
Pictures: Push Sq.
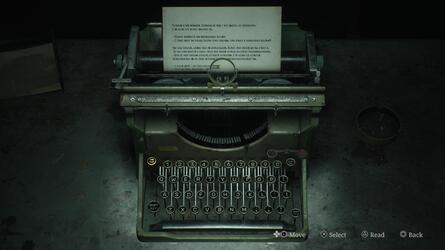
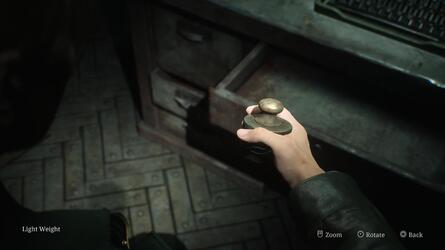
The staircase will take you as much as a brand new phase of ground 2F to free up a shortcut into Block C and Block D, after which additional up onto ground 3F to the Warden’s Workplace. Save your sport within the room to the left, then have interaction with the Typewriter at the major table. All you need to do here’s press the “Tab” key — the only you default to when interacting with the Typewriter — thrice. This opens a drawer underneath it to show the Gentle Weight.
 Pictures: Push Sq.
Now return to the Scales within the Backyard and place the weights as follows to free up the Wingless Dove door:
 Symbol: Push Sq.
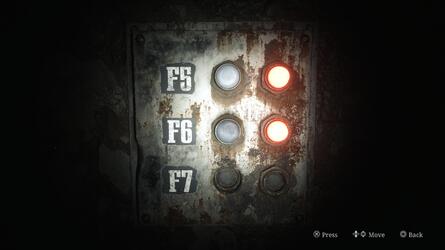
You can be within the Basement for this phase, and can grow to be trapped within when you squeeze during the hole within the cells. You can to find the occasional ammo and well being provide in one of the vital cells, however your major activity is to apply the hall round to the room reverse Mobile F15, accessed by means of a crawlspace at the ground. At the appropriate is a panel subsequent to the go out door, which will provide energy to each Mobile F5 and Mobile F6 the use of it.
 Pictures: Push Sq.
Flip each lighting inexperienced, and cross examine the 2 cells. Within Mobile F6, you’ll be able to to find The Lightest Weight. Choosing it up locks the door at the back of you, and it will appear to be any person is banging it from the opposite facet. Take hold of the Confession off the wall, then the banging will in the end prevent.
Memo #9: Confession
Input Mobile F6 after supplying energy to it and select up The Lightest Weight off the bottom. Doing so locks the door at the back of you and divulges the Memo pinned to the wall.
Pictures: Push Sq.
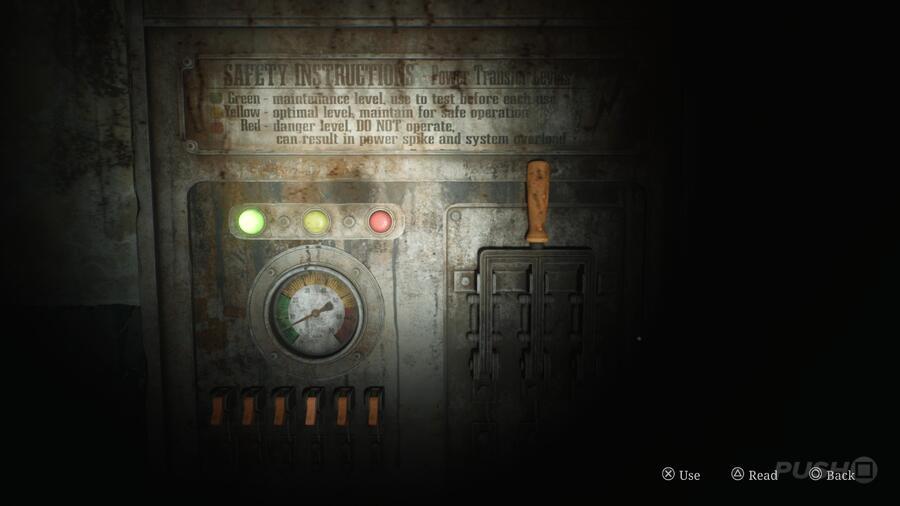
As soon as you are able to go away Mobile F6, input Mobile F9 and spoil a hollow within the wall to get right of entry to the ladder in Mobile F10. This takes you again as much as the principle ground 1F, granting simple get right of entry to to the Scales within the Backyard. Whilst you go back, a Gallows will seem at the back of the Scales which depicts any person being hung and a pair of Pyramid Heads. Make a save, then have interaction with the Scales. This time, you wish to have to make the dial level directly upwards in opposition to the sword. Here is the answer to take action:
 Symbol: Push Sq.
For fixing the puzzle, you’ll be able to earn the Execution Lever, which may also be positioned within the slot at the Gallows. You currently wish to fit up poem verses, with the answer discovered during the hyperlink underneath:
As soon as you have got appropriately coated up the poem verses and pulled at the appropriate rope, you’ll be able to drop during the ground into a brand new space. Pass during the morgue and leap down the outlet when brought about, then achieve this once more on the subsequent hollow. The Elevator on the backside will mechanically get started running when you cross within it, and while you achieve the ground, make a save and apply the hall right into a space after which via a door lined in paper. You can to find Angela at the different facet in a cutscene… but in addition the Summary Daddy.
Pictures: Push Sq.
It is a boss combat that takes position throughout a couple of hallways and homely rooms, and it will be repeatedly chasing you all the way through the stumble upon. We advise repeatedly sprinting away so you’ll be able to create a bit of of house between you and the boss, and turning round briefly to blast it with both your Shotgun or Rifle. If it will get too shut, it will grasp you in a snappy time match series, dealing harm. Repeat this procedure quite a few instances till the boss disappears and a brand new hall opens up that is lit with lamps at the partitions.
Pictures: Push Sq.
You must in brief spot Angela up forward, who you wish to have to apply whilst the Summary Daddy destroys the corridors round you. Whilst you to find the static TV, spoil it together with your Metal Pipe. The Summary Daddy will seem briefly as soon as once more and grasp you for a fast time match, and you’ll be able to break out at the back of it afterwards. Climb during the open window after which squeeze into the cabinet full of newspaper clippings. Go out to the left, then the boss will reappear, permitting you to wreck it extra. Pass previous the place you noticed it come from and apply this hall via, in the end passing an running fan after which smashing some other static TV.
There will be a 3rd TV to damage within the subsequent space, after which doing so transports you to the following location that is full of respiring materials at the partitions and lively equipment blowing out smoke. Climb during the fan and you’ll be able to input a bigger room, the place the general showdown with Summary Daddy will start. Proceed to blast the boss together with your Shotgun and Rifle whilst keeping off its grabs and it will in the end die and a cutscene will play.
Pictures: Push Sq.
Whilst you regain keep watch over, return the way in which you got here previous to the boss combat and James will mechanically carry up a map he is placing in combination himself of the Labyrinth, which is the place our Silent Hill 2 Walkthrough continues.
Did you to find our Walkthrough overlaying the Ancient Society in Silent Hill 2 and all its Collectibles helpful? Our Silent Hill 2 Walkthrough continues in our Labyrinth Walkthrough, and we’ve much more steerage and data in our total Silent Hill 2 information.
Up Subsequent: Labyrinth
![]()
Liam grew up with a PlayStation controller in his arms and a love for Steel Tools Cast. In this day and age, he is discovered enjoying the most recent and biggest PS5 video games in addition to supporting Derby County. That ultimate element is his downfall.